




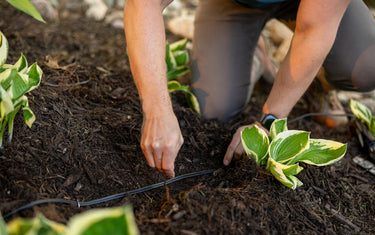
Burying low-voltage landscape lighting wire is a straightforward job that most DIYers can finish in an afternoon. Done well, the wire disappears under turf and stays out of sight and out of trouble for 15 to 20 years. Done poorly, the wire surfaces in a year, gets cut by a string trimmer, or fails at a buried splice that was never set up to handle moisture. Here is how to do it right the first time.
How Deep Is Deep Enough
For low-voltage landscape lighting wire (typically 12-volt AC, often labeled as Class 2 cable), burial depth is less prescriptive than for line-voltage circuits. The wire is not capable of delivering a dangerous shock, so the rules are about durability rather than safety.
Practical depth guidelines:
- Under turf or sod: 3 to 6 inches
- Under mulch beds: 2 to 4 inches
- Under gravel or stone: 4 to 6 inches
- Across lawns where aeration is done: at least 6 inches to clear typical aerator depths
- Under hardscape (paths, patios, driveways): in conduit, depth as required by the hardscape installation
Check your local code before burying. Some jurisdictions have specific rules for low-voltage wire under driveways or near pools.
Tools That Make the Job Easier
For a typical residential install, the basic tool kit is short:
- A flat shovel or edging spade for cutting turf slits
- A garden trowel for shallower digs and around fixtures
- A pruning saw for cutting through small roots
- A wire-pulling tool or short length of conduit for under-hardscape pulls
- Knee pads (the most overlooked tool on the list)
Larger jobs can use a mechanical edger or a sod cutter, but for runs under 150 feet a flat shovel is usually faster than setting up power equipment.
The Slit-and-Fold Method
The fastest way to bury wire under existing turf:
- Use a flat shovel to cut a vertical slit 4 to 5 inches deep along the wire's intended path
- Lean the shovel handle to one side, opening the slit slightly
- Drop the wire into the slot, pressing it to the bottom with your fingers or the back of the shovel
- Release the slit; the turf folds back over the wire
- Step on the slit to compact the soil and re-seat the grass
Done well, the slit closes cleanly, and the turf rebounds within a week. The lawn looks undisturbed within two weeks. No replanting or seeding needed.
Where Slit-and-Fold Does Not Work
Slit-and-fold works in cohesive turf with intact roots. It does not work in:
- Loose mulch beds (use a shallow trench with a trowel)
- Gravel or stone (lift the gravel, lay the wire, replace the gravel)
- Recently planted areas without established root systems (the slit will collapse)
- Frozen ground (wait for thaw or use a different method)
Trenching for Long Runs
For runs over 100 feet, or where the wire needs to pass through plantings, a shallow trench is faster than continuous slit-and-fold:
- Use a flat shovel or trenching tool to cut a 4- to 6-inch-deep trench
- Lay the wire in the trench with slack at fixture locations
- Backfill with the excavated soil
- Tamp lightly and water in to settle
Crossing Hardscape
The rule for hardscape crossings is simple: do not cut hardscape after the fact. Run conduit during hardscape construction.
If hardscape is already in place and you have to cross it:
- Look for existing expansion joints or grout lines that can be used
- Consider going around the hardscape if the route allows
- For driveways, a small directional bore (often a contractor service) avoids breaking the surface
- For sidewalks, a temporary saw cut and patch is sometimes the only option
Under any hardscape, the wire must be in conduit. Direct-buried wire under concrete or pavers will eventually be cut, crushed or pinched.
Routing Around Obstacles
Four rules for routing the wire around the property:
- Stay at least 12 inches away from sprinkler heads to avoid future repair conflicts
- Cross irrigation lines perpendicular and at a different depth, not parallel
- Avoid running directly under areas where you will be doing future digging (next year's bed expansion, fence post hole)
- Route through bed edges rather than across open lawn when possible (less exposure to aeration and edging tools)
Slack at Every Fixture
At each fixture location, leave a 12-to-18-inch loop of slack wire above the splice. This loop:
- Allows fixture repositioning without splicing
- Absorbs thermal expansion and contraction
- Provides material for future repairs without pulling fresh wire from the trunk
Without slack, every future adjustment requires a new splice. Splices are weak points. Fewer splices, longer life.
Splice Burial
Buried splices need three things to last:
- The right connector (gel-filled or silicone-filled, rated for direct burial)
- Burial in well-drained soil; not in low spots that collect water
- Mechanical protection from soil settlement and freeze-thaw
For splices in low-lying or wet areas, double-protect with an adhesive-lined heat-shrink boot over the gel connector. The extra five dollars per splice eliminates the most common service call cause on aging systems.
Marking the Route
For your future self or any future contractor:
- Sketch the wire route on a property map
- Note fixture locations and splice points
- Save the sketch with house records
When a future yard project needs to know where the wire runs, the sketch saves a half-day of guesswork or a multimeter-and-tracer search.
Next Step
Walk your planned route before you dig. Mark fixture locations with stakes or flags. Identify hardscape crossings and decide whether to go around or through. Buy 20% more wire than the measured route requires. The slit-and-fold method handles most of the rest of the work efficiently.


